Tuesday, March 28, 2023

Makeup Over 40

Makeup Over 40:

The past couple of years have left me with changes in my skin, hair, weight and more. While this conversation may feel shallow or tone deaf amid issues more important than my sudden lack of hotness I was not ready for these changes. I certainly never anticipated such noticeable negative changes appearing suddenly and in an advanced enough state that I barely recognize myself.

As much as I want to curl up in a ball and cry over the death of my youth, I am an action oriented person. After taking stock of my skincare and makeup routine I evaluated what products were still working for me and which should be replaced to better meet the needs of current me (not the younger version of me). 

#1 Skincare Solutions
Any skin issues should be discusses with your dermatologist.  I am simply sharing what I have changed in my personal routine.  While I have tested a number of skin creams and potions both OTC and prescription the three that made it include Thayers Facial Toner.  I apply this toner to a cotton round and swipe it onto my face each morning after cleansing to lock in all-day hydration.  My skin has always been sensitive, but lately has gone from dry to dehydrated.  I do live in a desert climate, but my skin needs all of the hydration I can provide it. This toner is alcohol free and very gentle on the face. As we age our lips may also start to lose volume.


 I cannot bring myself to get lip injections. I hear they are very painful.  My favorite OTC topical BeautyBio The Pout Volumizing Lip Serum in Sparkling Rose.  I know many Makeup Artists who use this because your lips appear instantly larger.  The results are only temporary, but a small amount yields impressive results.  This can be worn alone, or I usually add it as a base coat under my lipstick. 

My hair is also think and the problem seems to be getting worse.  I have had good luck with Vegamour GRO Hair Serum and their heart shaped Biotin Gummies. 


The most important skincare item you should wear is SPF.  I have always been diligent about wearing sunscreen so nothing changed for me on that front. 

#2 Color Correction, Base and Concealer
Start with a primer that is best suited for your skin type. I started using Stila One Step Correct Kitten Skin Tone Correcting & Brightening Primer because one of the issues I have been facing is discoloration and melasma.  This is my first step in color correction and priming my skin for my base.  There are a number of hydrating, glowy or matte primers.  Pick one depending on your personal need. 


My melasma is too prominent for just concealer.  After applying primer to my entire face with my fingertips, I use a peach and green color corrector.  I use the peach one dotted over any melasma spots and gently blend the edges.  I also use the peach tone to correct my under eye circles.  The green, I use sparingly to cover any redness around my nose, or the corner of my eyes.  Jeffree Star Cosmetics Magic Star Concealer in Peach and Green are the products I use, but there are a number of color correctors from the brand available at Beautylish. For melasma, the corrector should be dark enough to cover the dark spot.  


Next is foundation.  There are a couple of options that I like.  If I want something lighter I will pop on Bioderma Sensibio AR CC cream visible redness reducer skin-perfecting care for sensitive skin.  This can be worn as a primer instead of the Stila one and works well under makeup or as your base over the color corrector. 


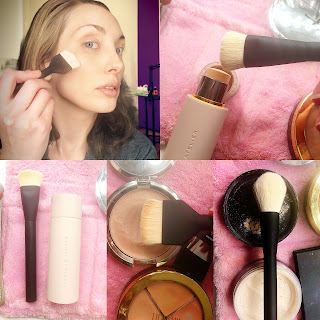
Most days my melasma needs more coverage.  I used to use liquid foundation, but switching to cream foundation has been a game changer for me. Brands I recommend are Monika Blunder Beauty, Wayne Goss and Honest Beauty.  Monika Blunder's Blunder Cover is an all-in-one foundation and concealer.  You can sheer it out for a natural looking base, or I tend to use a smaller brush and stipple it over the areas where I applied the color correction and buffing into the skin. 

Wayne Goss The Luxury Cream Foundation is a nice option as well because the coverage is also buildable.  If you like loose powder the Luxury Complexion Set, available at Beautylish, includes a Luxury Cream Foundation, The Weightless Powder and a Poreless Beauty Puff which can be used to apply the foundation and powder. 

If you like pressed powders, I enjoy Koh Gen Do Brightening Moisture Powder which comes in Brightening Pink (brightens and revitalizes dull skin) and Warm Beige (blurs the look of pores and lines).  The powder in this compact is delicate, so be cautious when packing it in your bag for touch-ups.


For concealer, I use It Cosmetics Bye Bye Under Eye applied with a concealer brush over the corrector. Due to my dehydrated skin, I have found cream products are work best for me these days.  This concealer does require a minimal amount of powder to set it. I recommend setting with a small eye brush or puff once your concealer is applied

#3 Color Cosmetics
Beauty brands finally started listening and there are a good number of quality cream bronzers, blush, and multi-sticks to choose from. Pictured below are blush options from Milani, Ilia and Honest Beauty.  The cream bronzer is from Pacifica Beauty.  It is the Sun Dreams Matte Cream Bronzer + Contour.  If you use cream or powder I do recommend looking for formulas with a matte finish as they are more forgiving and won't emphasize texture. 

#4 Brows
As we age our brows tend to get more sparse. I personally like using a brow pencil to fill in spots that need it and then set with a clear gel.  There are many good products to choose from here also so you don't have to break the bank.  Lately I have been usi
ng e.l.f. Instant Lift Brow Pencil in Neutral Brown along with NYX Control Freak Eyebrow Gel.  Select a smudge-resistant formula with a fine tip for better accuracy. 


#5 The Eyes Have It
Wear what makes you happy.  If you are 90 years old and love glitter - go for it.  I have found matte shadows are more flattering in brown, peach and coral tones based on my coloring.  The matte texture looks more natural and doesn't add emphasis the way shimmery shadows can. 


I do recommend that you take the time to curl your lashes.  This should always be done prior to applying mascara unless you are using a heated eyelash curler which is intended for use with mascara.  Using an eyelash curler opens up the eyes and you will notice a difference even before you apply mascara!


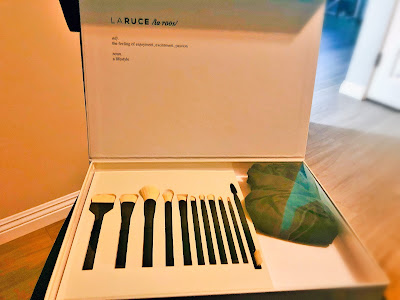
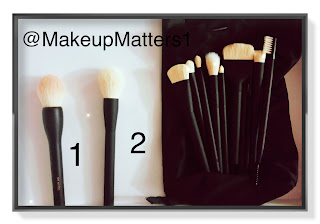
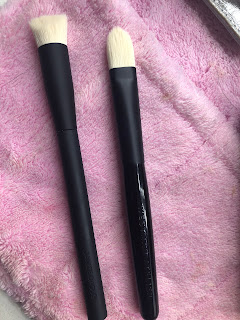
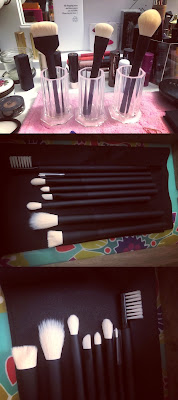
If you are going to upgrade your makeup, I highly suggest looking into upgrading your tools if needed.  High quality brushes will make a significant difference and now more than ever using soft bristles around the delicate eye area is a must. 


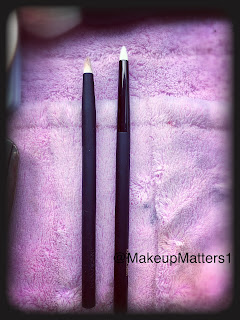
For eyeliner, I still love Urban Decay 24/7 Glide-on Eye Pencil in Whiskey. If you don't typically use eye liner, try using it to tightline your upper lash line as it will create the look of fuller lashes. Wiggle the liner in between your lashes and smudge with a cotton swab for beautifully defined eyes. 


Mascara is not new either, but instead of looking for lengthening formulas, opt for volumizing formulas and apply only to the top lashes.  Lately I have been enjoying Pillow Talk Push Up Lashes! from Charlotte Tilbury in the color Dream Pop.  The volume and lifting effect lasts all day and the slim brush head makes it easy to get very close to the roots of the lashes.  The formula is also smudge and humidity-proof. 


#6 Lip Service
For lips I want a nice neutral color that isn't too far off from my natural lip color.  I start with a neutral liner to prevent bleeding and keep everything in place.  Most days I only apply a lip gloss. I prefer something hydrating and nothing too dramatic such as Koh Gen Do Maifanshi Lip Gloss which is a lip treatment based Lip Gloss that provides a plump and healthy looking pout. 


#7 Lock It In
Finally I use Jeffree Star Cosmetics Wedding Proof Makeup Setting Spray which is available for $26 from Beautylish. The reason I like this one is that it is waterproof and truly sets my makeup so that it lasts all day long.  I just close my eyes and mist it over my face once I am done with my makeup.  I have noticed such a difference when using this setting spray and I can't imagine not having it in my toolkit. 


That's all for now! I hope you found this post helpful.  The changes that I have started to see in my skin and hair honestly caught me by surprise.  When I talk to my female friends it sounds like I am not alone. This is just what works for me.  Please share your tips and questions below!


Here is the completed look using the tips above:


Tuesday, January 18, 2022

Looking for the Best Brush Set?


What happens when a luxurious vegan and cruelty-free brand like LARUCE Beauty collaborates with the uber-talented Freelance Makeup Artist, Janice Daoud? A makeup brush set worth writing about!  Janice Daoud has worked with some of the top celebrities of the moment, including Miley Cyrus and Rihanna.  Her work has graced the pages of Vogue, Cosmopolitan, and Rolling Stone and her Runway and client work are all names easily recognizable.  I first learned about the LARUCE X Janice Daoud Brush Set ($100 retail) on Instagram.

The Makeup Brush Set – Why You’ll Want to Buy!

When I ordered the LARUCE X Janice Daoud Brush Set, I was taking a gamble. I did not know anyone who owned the set, but the Instagram advertisements intrigued me. After watching Janice Daoud’s video on the LARUCE Beauty Instagram page where she details who this set was designed for (Everyone!), what was included and why she decided to collaborate with LARUCE I placed my order. The video I watched, was her first look at the retail set as she had been using the prototypes previously.  I could tell that she put a lot of thought into every single aspect of these brushes.  Even the brush numbers were created using numbers that were meaningful to her.  The microfiber towel (included with set) is intended to mimic her backstage setup.  All makeup artists I know put down some sort of a towel before laying out their tools.  Since Janice is known for her skin work, I was personally eager to get my hands on her sculpt and contour brush (which did not disappoint). Her decision to include a microfiber pouch for easy carrying of the brushes also made this purchase a no brainer.

If you are new to my site – Welcome! – I should let you know that I own quite a comprehensive brush collection.  I own hundreds of makeup brushes from brands all over the world.  When I first get a new brush or brush set, I look for similar brushes in my existing collection to compare it to. I was very excited to see that this set most closely resembled my Rae Morris brushes. Rae Morris is a world-renowned Makeup Artist and designed the Rae Morris Magnetic Brush Range. While the LARUCE X Janice Daoud Brush Set is not magnetic, I am happy to report that the brushes are shaped perfectly and will change your makeup application. While I respect Rae Morris as an artist and enjoy her brushes in my humble opinion they are overpriced.  On a positive note, this set from LARUCE is an absolute steal! If you were considering buying the Rae Morris brushes, I highly suggest you consider the LARUCE X Janice Daoud Brush Set instead.

For Comparison:

1.      The Jishaku #2: Mini Kabuki from Rae Morris retails for $95 on her site

2.      Number 10 Powder Brush: LARUCE X Janice Daoud Brush Set (includes brush number two below, plus ten other brushes pictured -below, right – microfiber towel and microfiber carry bag)


How does the LARUCE X Janice Daoud Brush Set Perform?


I have been testing this set since I received it on December 29th, using a variety of mediums and techniques.  This set truly holds its own against many of my higher-priced Japanese made brushes.  If you own a traditional brush set from a brand like Sigma or MAC, I think you will find this set offers some truly unique shapes that would complement a traditional set nicely.  Standouts for me include the #18 Lip Brush, #27 Precision Contour Brush and #31 Shadow Brush. The #18 Lip Brush is a truly unique shape in my collection.  The way it hugs the cupid’s bow makes applying lip color truly effortless. The #27 Precision Contour Brush is another unique shape and is great for so many things including contouring the nose and under the lips. The #31 Shadow Brush is a standard shaped eye brush, but I think the size of it makes it a great choice as an all-in-one eye brush.  You can easily apply color to the lid with one swipe using this brush helping you create all your favorite looks.

When I started this site years ago, finding professional quality makeup brushes that were also cruelty-free wasn’t easy.  Many brands didn’t even list the bristle type (some still don’t) making it impossible to make an informed decision easily. Today the options may seem overwhelming.  I can confidently recommend this set for both makeup lovers and Makeup Artists. 

For those new to this style of makeup brush, please note the (intentional) smaller size.  The handles on this set are slightly longer than the Westman Atelier, with the #25 Detailed Eye Brush (pencil-style brush great for smudging along the lower lashline) slightly shorter than the Rae Morris Jishaku #9.1: Pencil Point Shader. If you are in the market for new brushes to round out your collection, start a new one or get a gift for the makeup lover in your life who has everything, look at the Laruce X Janice Daoud Brush Set and see the difference for yourself.  The value is quite apparent when compared to similar style brushes available on the market and this set really shines as one that will meet the needs of many different artists, regardless of their level of expertise. 


Pictured Above: #25 Detailed Eye Brush (above left) slightly shorter than the Rae Morris Jishaku #9.1: Pencil Point Shader (above right)


Pictured Above:  #27 Precision Contour Brush (above left) slightly longer than the Westman Atelier Eye Shadow I Brush (above right)


Pictured Above: A closer look at the set 


Have you purchased the LARUCE X Janice Daoud Brush Set yet?  Which brushes do you think you will get the most use out of? 

Please share your questions / comments below!  Thank you for reading and don't forget to subscribe so that you never miss a post. 


Monday, August 24, 2020

New Lipsticks

A look at my new peachy lipsticks...


I have recently been in a peachy lipstick phase. To begin my search for the perfect apricot-nude hue, I went to my favorite makeup shopping site beautylish.com. ABH Cosmetics has a highly rated matte formula and a variety of colors to choose from. At $18 each, I added two matte shades to my cart including Peachy and Hollywood.  Peachy is a nude-peach matte formula that glides on the lips with full pigmentation.  Hollywood, though somewhat similar applies as more of a light peach when compared to Peachy.  On the more luxurious side, I opted for Wayne Goss Lipstick in Camellia which is a sheer cream formula.  The color is a light peachy-nude that has a lovely sheen to it while still allowing a hint of my natural lip color to come through.  The sleek black packaging looks expensive and costs quite a bit more than your average lipstick coming in at $28 each.  However, if you suffer from dry lips or matte formulas simply don't work for you I highly recommend this creamy goodness in a tube from Wayne Goss. 


While I do prefer a glossy lip these days, I still love a matte lipstick.  On days where I want added shine, I simply top my matte lipstick of choice with a matching gloss.  In the photo above, I am wearing ABH Cosmetics Matt Lipstick in Peachy topped with Sunny Day Lip Gloss from Burt's Bees (sheer shimmering peach). This combo definitely gave me that peachy vibe I was looking for!


In the above photo I am wearing ABH Lipstick in Hollywood, topped with Buxom gloss in Emily (light peachy nude plumping formula).  While the lip looks in both photos look quite similar, Hollywood is in fact a touch lighter in person and leans a bit more nude. 

I don't know what it is about summer, but I tend to lean toward nude, peach and lighter colored lip shades this time of year.  Perhaps it is because the eye looks I tend to wear this time of year pair well with a more subtle lip, or maybe it is to compliment the blue in my eyes. Regardless of the reason, I am quite happy I added these three lipsticks to my collection and have no doubt that I will continue to get a lot of wear out of all three tubes.

What is your favorite peach colored lipstick?  Please share in the comments below!

* This post is not sponsored.  All of the products in this post were purchased by me. 


Tuesday, July 21, 2020

Tips for Keeping Your Makeup Brushes Clean

Tips for Keeping Your Makeup Brushes Clean!

It has certainly been a while since I have written a blog post. Like many of you, I am stuck at home and feeling overwhelmed by everything going on in the world.  I don't know why, but one of the few things that I find relaxing is cleaning my makeup brushes.  Over the years I have tried a number of cleaning solutions, methods and storage options for keeping my makeup brushes in pristine condition. 

Here are a few tips that work well for me and help me find a moment of peace in an otherwise insane world.

*All of the items in this post were purchased by me.

On to the tips.....
  • Tip #1: Separate dirty brushes. I always keep an empty cup on the side of my makeup table.  After I am done applying makeup, dirty brushes go in that cup away from my clean brushes.  I never contaminate my fresh brushes by mixing them in with dirty ones filled with product.
  • Tip #2: Different brushes may need different cleaning methods.  In general I try to follow the recommendation of the brush manufacturer for keeping my brushes clean.  For example, I have some more expensive, delicate brushes that are hand made.  With these types of brushes, I am more gentile with how I clean them.  I will often use a soft microfiber cloth and wipe in the direction of the bristles.  In general the way you use a brush on your face is the same motion you can use to clean it.
  • Tip #3: Sanitize with 70% alcohol.  I read so many articles telling people to use 99% alcohol to clean brushes, and this is just plain wrong.  If you use something stronger than 70% alcohol, it will evaporate before actually sanitizing anything.  If you use something less than 70%, you are likely not killing the bacteria and germs as intended.

  • Tip #4: Be mindful of the professional brush cleansers your choose.  As far as professional brush cleaners go, there are a number of wonderful options on the market.  However, I personally prefer to use clear brush cleaner because I have found certain colored solutions can leave an unusual blue cast on white bristled brushes.  When I look at some of my more special brushes from Rae Morris or Westman Atelier the thought of their snow white bristles staining with blue antiseptic does not make me happy. That being said, I have used something like Cinema Secrets (a blue colored solution) to clean my darker bristled brushes.  Cinema Secrets does a thorough job and dries very quickly which is why it is an industry favorite.  There are a number of similar products on the market that are completely clear in color as well. 

  • Tip #5: Dry brushes upside down or on a flat surface. It doesn't matter if you use a shampoo, professional grade cleaner, and/or alcohol to clean your brushes if you don't dry them properly.  If you place a brush handle side down right back into a brush cup after cleaning, some of the moisture may seep down into the ferrule loosening the glue that holds the bristles together. There are a number of options for brush drying on the market including brush trees (such as my old favorite Benjabelle), the Sigma Dry 'n Shape, and even newer styles that clip to the side of a counter or look like a file bin you might find in the office. You don't really need any of these items.  Simply lay your freshly cleaned brushes flat on a towel until they are completely dry.  I recently purchased the Sigma Dry 'n Shape because I often clean a large number of brushes at once.  I find this tower is a practical way to dry a large number of face and eye brushes at once time without taking up much counter space.  Plus once brushes are dry, it doubles as a cute desktop storage display. I still own the original version of this product and this new version is quite an improvement! 

The above photo is only one half of my complete Sigma Dry 'n Shape Tower.  The full tower holds over 90 brushes!  Plus, as the name suggests, has bands that help to shape the brush heads as they dry.

  • Tip #6: Proper storage will keep your brushes free from dust.  I know a lot of people like to store brushes in a cup.  This is fine if you want to keep  a few of your daily brushes handy.  When you have a large number of brushes, it is best to store them in a way that will protect them from dust.  There are many custom acrylic brush holders on the market.  Many artists I know prefer keeping makeup brushes in a fabric or faux leather brush roll.  I personally keep my brushes in drawers fitted with bamboo dividers.  Some of my brushes are stored in brush cups with a screw on lid that makes for easy portability.  Keeping brushes in a box with some sort of fabric or tissue paper underneath is also a good option.  Whatever method you opt for, I suggest rotating your brushes often.  After all they are meant to be used!


This is a picture of the inside of one of my Alex drawers from Ikea.  I have a bamboo organizer with adjustable dividers in place and have my brushes organized by brush type.  I store my more expensive brushes in a similar manner, but tend to keep them in a single layer.  Some worry that putting brushes in a drawer can flatten out or misshape the bristles.  For this reason, I rotate an use my brushes often.  There are some limited edition brushes that I keep in the boxes they came in.  I have also seen some more creative solutions online such as using a glasses case, jewelry box, or even a shoe box lined with tissue paper.


I do not recommend just throwing brushes in a drawer without some type of protection underneath.  The drawer dividers I use are also lined with contact paper and a clear coating so I can easily wipe them clean. 

Recap:
I personally clean brushes after every single use.  At the very least, clean your brushes weekly otherwise you are simply brushing bacteria onto your face. Remember, clean brushes with a solution that is right for you.  I know some makeup artists who swear by dish cleaning liquid.  If you are a professional makeup artist be sure to sanitize your brushes as well. Be gentle, and always squeeze out any excess water before laying flat to dry.  If using a cloth, be sure to use something lint-free such as a microfiber cloth. Only when your brushes are completely dry should you put them back in their dust-free storage area of your choosing. 

*I only own and use brushes made with synthetic bristles.  Synthetic bristles do not need to be conditioned.  They are not only more hygienic than natural hair bristles, but they are also hypoallergenic and kinder to our furry friends.

What do you use to clean your brushes?  How do you store your tools?  Please share your favorite makeup brush cleaning tips in the comments below!

Saturday, December 7, 2019

A Complete Guide to Fall 2019 Makeup Looks - Look 7

A Complete Guide to Fall 2019 Makeup Looks - Look 7


*All products in this post purchased by me. Not sponsored. 


This is the final post in my Fall 2019 Makeup Guide.  Perfect for evening, glossy lips have replaced the matte lip trend. The good news is, you can simply top your favorite matte liquid lip with a lip gloss to update your look. Playing with color combinations, or just adding a slick of clear shine makes this look easy for anyone to wear. 

Here is how to get Look 7:

The Trend: Glossy Lips

Depending on the color, and your personal style, glossy lips can be worn day or night. However, this trend is really about emphasizing the lips and adding extra glamour to evening looks. Keep foundation dewy and natural, brows full, and eye makeup to a minimum to get the full impact of this trend. A little eyeliner and mascara is fine, but your lips should be the star. Gloss comes in a number of formulas, textures, colors and price points.  It has the ability to make lips look more voluminous, and sexy!

Some of the lip glosses that I love (pictured above) are: Alexis Vogel Luminous Gloss, Milani Amore Shine Liquid Lip Color, Trish McEvoy Beauty Booster SPF 15 Lip Gloss, Nuance Salma Hayek Ultra Shine Lip Gloss (my favorite clear), Jordana Cosmic Glow (try Chromatic Peach), and my personal favorite - Jeffree Star Cosmetics The Gloss.

One way to wear this trend that is especially popular this season is opting for a dark glossy lip. To keep your pout looking pristine, line your lips with a lip liner close to your natural lip color (I used Trick from Obsessive Compulsive Cosmetics).  You can use the pencil to correct any unevenness or cheat a fuller lip. Fill in your lips with the pencil to create a base.  Top with a liquid lipstick in a terracotta, brick or a classic red color. I used Too Faced Melted Matte Liquid Lipstick in Gingerbread Man in the photo below. After your liquid lipstick has dried completely, top with your favorite gloss.  Start in the center of the bottom lip, spreading it out to the corners of your mouth, and press your lips together to coat your top lips. Apply a little extra to the top lip to accent the shape of your lips. I used Jeffree Star Cosmetics The Gloss in Wet Peach below. With so many different formulas on the market, it is important to make sure your liquid lipstick and gloss formulas are compatible. For example, a lip oil may break down the liquid lipstick.  I like The Gloss from Jeffree Star Cosmetics because they were designed specifically to work over liquid lipstick and there are a variety of colors and finishes to choose from. Layering a sheer, shimmery peach over a dark terracotta creates a unique and stunning lip combination that instantly makes your look appear more festive.  I love this type of look for holiday parties.  


If dark lip colors make you uncomfortable, simply layer a gloss over your usual lipstick hue. I feel like matte lips have been popular for so long, that I had to rediscover my love for gloss. If you prefer one product that does it all, try Milani Amore Shine Liquid Lipstick. This is a one and done product that works like traditional liquid lipstick, but has a high-gloss finish. If you like something custom, layer a couple of them together to create your own unique color. Below I combined the colors Addiction and Delight for a shiny nude lip.  To take the gloss to the next level, I applied a little bit of Jeffree Star The Gloss in Legends Only (creamy nude) to the center of my lips. 


I hope you enjoyed this guide to fall 2019 makeup looks.  Share your favorite trend in the comments below!


*All products in this post were purchased by me. This post is not sponsored. I do not get paid to write reviews or mention products.  All opinions are my own. 


Thursday, November 21, 2019

A Complete Guide to Fall 2019 Makeup Looks - Looks 5-6

A Complete Guide to Fall 2019 Makeup Looks - Looks 5-6

*All products in this post purchased by me. Not sponsored. 


Welcome back to my Fall 2019 Makeup Guide!  Today's post will contain one look for day, and one for evening. Both of these looks can be worn by anyone, but definitely lean on the fun side!  Again, both of these looks can be worn with the foundation and brow routine outlined in the previous post.  However, I do strongly urge you to start with the eye makeup for both of these looks for easier clean up. 

Here is how to get Look 5:

The Trend: Neon

There are a number of color trends this season.  We are seeing makeup looks in rosy tones, mauve, rose gold, terracotta, and pastels. Yet the real standout has to be the reemergence of neon.  For those of us old enough to remember the 80s, neon may bring up feelings of nostalgia. Others may be a little bit frightened by the thought of wearing colors that are so bold, especially in the daytime. Luckily, the look that I created is something that even the most timid person can pull off.  As pretty much every person in the world probably knows by now, Jeffree Star Cosmetics launched a collaboration with Shane Dawson.  I have the two palettes, Conspiracy and Controversy, which were gifted to me by my wonderful cousin Sandra. Thank you!!  

The Conspiracy palette contains a very bright, neon yellow eyeshadow with a matte finish, called Food Videos.  This shade sits in the middle of the palette and is extremely unique. I don't own anything else like it in my collection, and I don't think that I ever have. Like all of the Jeffree Star Cosmetics eyeshadows I own, the formula is rich and provides full-on pigment that lasts all day. These eyeshadows do not require an eyeshadow primer under them, but due to the fact that one of my eyes is slightly hooded, I tend to always start with a primer for extra insurance. As with most soft powder eyeshadows, you can expect to see some fallout in the pan.  If you are careful to just dip in your brush and tap off any excess, it will not land on your face.  That being said, I still recommend doing your eye makeup first, but that is mostly because it will be easier to clean up the edges of this eye look. 

If you do not have this palette, you can grab any neon eyeshadow that you have in your collection, or opt for a neon liner or pigment instead (as long as it is eye safe). You will also want a black eye liner, a good sharpener and a brush for drawing on the neon eyeshadow. One of the ways to make super bright colors more "wearable" is to use them as an accent. Rather than coating your lids in this super bright hue, using it as eyeliner (paired with black liner) is a fun way to dip your toes into the trend without going overboard. Choose a brush that you are comfortable using to draw on liner with.  This may be a fine liner brush, or an angled eye brush.  It really is a matter of personal preference. 

The look is achieved with a simple method, but you do want to take your time and practice patience. This is especially true if you are a beginner or not someone who wears liner often. Begin by priming the eyelid with your favorite eyeshadow primer.  Then after sharpening your black eye pencil, tight line your upper lashes, and apply the black pencil to your lower water line. Going into the Conspiracy palette, brush a light layer of My Pills (soft pink-beige with matte finish) all over the eyelid as a base. To emphasize the crease of the eye, apply Tanacon (neutral light brown matte) into the natural socket of the eye with a blending brush.  Define lower lashes, by smudging Diet Root Beer (soft chocolate brown matte) along the lower lash line with a pencil brush.  You may want to take a small tapered brush without any product on to blend the shadow out a bit. 

Neon is easiest to wear when paired with black liner and other neutral colors. I lined my upper lashes with a black waterproof liquid eyeliner from Urban Decay.  

Now for the fun part!  Line your upper lash line with Food Videos (neon yellow matte), keeping it just above where the black liquid liner was placed. I used a very fine liner brush that I picked up from an art supply store, but use whatever type of brush you are most comfortable with.  Build up the intensity of the shadow until you reach the level of opacity desired. I recommend pressing the color on using the side of the brush.  The stamping motion really allows for maximum color payoff. 

If desired, apply false lashes or just coat your own lashes with lots of black mascara. I used EcoTools Everyday Length Naturally Beautiful Lash System.

For extra staying power (and to help camouflage the lash band), I applied My Ride's Here (deep black matte) over the liquid liner with a black angled brush.  I winged out the black liner just a bit, making sure the bottom connected with the black pencil in my water line.       

Here is the final look:


To get even more use out of the Conspiracy palette, I used Pig-ment (soft petal pink matte) as my blush, and a tiny bit of Ranch (cool metallic silver) as my face highlight. 


While I did wear this look in the daytime, it was a weekend. Depending on your occupation, neon may be a bit much for the workplace. To keep the focus on the eyes, I opted for a natural looking glossy lip. 

Look 6

The Trend: Glitter liner

This trend is best left for evening makeup looks, preferably when going to a special event. I recently wore this to a wedding that I attended. All of the evening looks that are currently popular choose one feature to make the star.  You want to emphasize eyes or lips, not both. There are so many options when it comes to glitter liner. Again, I recommend that you work with what you have.  My only true rule is that you are sure the glitter you are using is eye safe. Craft glitter is not OK to use for this look as it could cause serious damage to your eyes. You will also want a good glitter glue, some liquid liner and a black mascara. 

This look can be achieved by using an actual glitter eyeliner.  Urban Decay makes several fun colors of metallic and glitter liquid liner that are very easy to use. If you have a pressed glitter eyeshadow, roll-on formula or liquid eyeshadow any of those will work as well. I opted for my favorite glitter of all time, Lit Cosmetics loose glitter. You will also want to have some matte eyeshadows handy.  I used the Jeffree Star Cosmetics Mini Controversy Palette


Below are some swatches of the above glitter options.  I recommend testing out the product you are going to use on the back of your hand to see how it applies.  This will give you a better idea of the size of the glitter particles, and how it will actually appear on the eyes before you actually paint it over the glitter glue. 


I really tested out a lot of products before deciding on the Lit Cosmetics lavender color glitter. To begin, apply an eyeshadow primer if desired (optional) followed by your lid color. I used Exposed (soft matte lavender) from the Mini Controversey palette, patting the color on my eyelid until I reached the desired amount of coverage. To highlight just under the brow, I used Cry on My Couch (matte neutral light tan) and down blended to create a seamless transition between the lid color and highlight.  Since we are using glitter here, I recommend keeping your under brow highlight matte and pretty close to your natural skin tone. To emphasize my crease, I swept on Diet Root Beer (soft chocolate brown matte) with a fluffy brush.

After your eyeshadow is applied, you will want to use a black eye pencil to tight line upper lashes and lower water line. Next, grabbing your black liquid liner, apply a very thin line across the upper lashes.  You do not have to wing it out, but rather you want to hug the lashes with the brush of the liner. Let the black liquid liner dry completely, then take a silver liquid liner and draw a line on top of the black liner. I used Bobby Dazzle from Urban Decay, a whitish silver with iridescent sparkle because it has a nice fine brush that is easy to use. Once that completely dried, I used a fine liner brush and coated it with Too Faced Glitter Glue before dipping it into my glitter from Lit Cosmetics.  Lit Cosmetics also makes a fantastic glitter glue that makes their loose glitters very easy to work with.  I ran out of mine, so opted for the Too Faced Glitter Glue instead. I prefer to work on a stainless steel palette to mix the glitter and glue together.  If you don't have one, you can work off of a plate or simply dip the glue coated brush into the glitter directly from the pot. Once the brush has the right amount of glitter glue and glitter on it you can test it out on the back of your hand first if desired.  Otherwise, go ahead and pat the glitter on right over the silver liner. 

If desired, you could omit the silver liner and go right to the glitter.  You could also omit the glitter and just use Bobby Dazzle as there are fine iridescent sparkle particles in it.  It really depends on how much glitter you want.  I chose this layering technique because I find the liquid liner serves as a nice base to fill in any gaps.  It also creates more of a multidimensional sparkle look to the liner since there are now two different sizes of glitter on the eyes. Once your have completed applying the glitter, use a pencil brush to apply a little bit of Diet Root Beer to the lower lash line.  Follow with multiple coats of black mascara on top and bottom lashes. 

Here is the final look:


As you can see, I also kept the lips neutral for this look. Brows were groomed, but natural looking and the rest of the face makeup was quite subtle. 


These photos really do not capture how lovely this look came out. The way the glitter caught the light as I moved was simply stunning. I used concealer to clean up any edges, and since I used a glitter glue, there were no stray glitter particles stuck to my face at the end of the night. Finish off with a spritz of your favorite setting spray and this look will last all night!

I tried to make all of the looks in this guide easy to apply and wear.  My final look in this series will be next, with a focus on glossy lips for evening. Please let me know if you try any of these looks in the comments below.  What are your favorite makeup trends this season?


*All products in this post were purchased by me, or gifted to me by a family member.  This is not a sponsored post.  I do not get paid to write reviews, or include any specific products in my posts.  All opinions are my own. 


Monday, November 11, 2019

A Complete Guide to Fall 2019 Makeup Looks - Looks 2-4


A Complete Guide to Fall 2019 Makeup Looks - Look 2-4


*All products in this post purchased by me.  Not sponsored. 


As promised, this next look will be all about the perfect lip colors for Fall 2019. This post will show three looks in total, all daytime appropriate. All three of them will begin with the same foundation and brow makeup.

For your foundation:

  1. Prep your skin.  I recommend a good moisturizer that is appropriate for your skin type.  If there are parts of your face that get particularly shiny or oily throughout the day, you may want to add a primer to those sections. 
  2. Prepare your tools. Wet your beauty sponge and decide which brushes you will use. This comes down to personal preference, though I will offer guidance along the way.
  3. Apply your foundation. Start with the areas of your face that need the most coverage first.  Work in light layers, allowing the product to soak into your skin before adding more. The goal is to even out the skin, but we still want it to look like skin.
  4. Add the finishing touches.  Now you can add your liquid highlighter and concealer as needed.
  5. Set everything with a light layer of powder. Be cautious not to powder too heavily over the areas that you want your liquid highlighter to shine through. Depending on your skin type, you may want to leave the tops of your cheekbones powder free.  Otherwise, you can add a powder highlight over your powder at the end if desired. 

For natural looking brows:

  1. Choose your weapon(s). Decide on a pencil, pomade, powder, wax, gel or any combination that you desire. 
  2. Brush your brow hairs up with a spoolie. If necessary you may trim just the tips with a small pair of scissors, but natural brows are in so I recommend doing as little cutting/tweezing as possible. 
  3. Start by emphasizing the bottom of your brow with the product(s) you chose in step one above. This will help even out the shape of your brows. 
  4. Draw hair like strokes through any sparse areas of your brows with your pencil or brow powder.
  5. Give a final brush through with your spoolie to blend in the product and set with a brow gel if desired. 


Now for Look 2


The Trend: Red lips (try crimson or oxblood)

This season lipstick should be worn in a very effortless way.  With your foundation on and brows groomed, all you need is a swipe of lipstick and you are ready to go!  Lipstick can be worn in a stain or glossy (concentrated in the center). For a more casual look, you may want to try a red that leans more gingerbread or even plum in hue. 

Some of my favorites are: Urban Decay in the color Gash, Jeffree Star Cosmetics Velour Liquid Lipstick in Designer Blood or Redrum, NYX Pump it Up Lip Plumper in Scarlett, Too Faced Melted Matte Long Wear Lipstick in Gingerbread Man. 

I used Redrum from Jeffree Star Cosmetics, painting it onto the center of my lips then spreading it over the rest of my lips using my pinky finger. 

Here is the final look:


I did end up adding a touch of mascara to my lashes after curling them. However, if you feel comfortable feel free to leave your lashes bare. 

Look 3

The Trend: Monochromatic looks in terracotta and/or mauve


For this look, I used the color mauve throughout the entirety of my face. Again, my foundation and brows were the same as above.  I was inspired by my Cover FX Monochromatic Blush Duo in Mojave Mauve.  This blush is just so stunning and easy to blend. Mauve has always been a color that just works for me. I began by applying the matte side of this blush duo onto my cheeks, and then applied the shimmery side in a light layer over it, focusing mostly on the tops of my cheekbones.  Instead of eyeshadow, I used this same blush duo on my eyes. Using a fluffy eyeshadow brush, I swept a light layer of the matter color through the crease of my eyes, and then tapped some of the shimmery side onto my eyelids. Using a cotton swab, I applied a little bit of the matte color along my lower lash line. For lips, I used a mixture of Urban Decay's glossy pencil in Lovechild and Tarte lipstick in Plummy Rose.  Then I patted just a tiny touch of the shimmery side of the blush duo onto the center of my lips to bring everything together. 

Due to the popularity of monochromatic makeup looks, many brands have eyeshadow and lipstick of the same color.  For example, Jeffree Star Cosmetics has eyeshadow and Velour Liquid Lipstick in colors Androgyny, Celebrity Skin and Dominatrix (to name a few).You may even want to use those eyeshadows as blush for the full monochromatic look!  Have fun and search your stash for colors that will liven up your look but still look good on cheeks, eyes and lips. 

Here is the final look:


As you can see, I skipped mascara for this look.  I did curl my lashes to keep the eyes open and bright. If you must wear mascara, try applying only one coat to the top lashes only. This is a great look for any occasion, and works well in the office, or using a richer color and some liner for evening. 

Look 4

The Trend: Natural makeup

This look is the easiest to pull off, and is suitable for everyday. It is not a "no makeup" type of look, but rather one that sticks to a more natural color palette. 

The Urban Decay Naked Palettes are a great pick for this look. I used the Naked 3 Palette, but you can use any of the Naked Palettes you prefer. You will want two matte eyeshadow colors (one highlight and one contour) and one shimmery color. I used Strange (an extremely light neutral matte pink), Burnout (matte light dusty rose) and Limit (pinky-peach satin) for my three shadows. 

You can use an eyeshadow primer if desired, then take your matte highlight eyeshadow and apply it from lash line up to just under your brow.  Using a crease brush, sweep your matte contour shadow through the crease of the eye. The colors should be light and blended together to keep everything very natural looking. Pat some of the shimmery eyeshadow on the eyelid to bring light to the look. 

Next, tight line your upper lash line with a brown eye pencil. I used Dominatrix (chocolate brown) Lip Liner from Jeffree Star Cosmetics (eye safe). Coat your top lashes only with mascara.  I used Ilia After Midnight Mascara to add some length. For blush, I used Tarte Amazonian Clay Blush in Exposed (a very natural looking nude color).  You want something that looks very natural and doesn't lean to pink or peach.  Matte formulas are best for natural makeup looks. If you do want to add a bit of a highlight for the appearance of a dewy complexion, use a fan brush to sweep The Balm's Mary-Lou Manizer on the tops of cheekbones. To keep everything looking as natural as possible, I went over the edges of my highlight and blush with a damp beauty sponge from Real Techniques. 

Finish off lips with a thin layer of gloss that is close to your natural lip color. 

Here is the final look:


I hope you enjoyed these daytime appropriate makeup looks. All three are quite easy to apply and are classic looks that never really go out of style, despite being on trend this season.  I have one more daytime look that is a bit more on the fun side coming up, and then a couple of evening looks to finish out the season.  Sadly, here in Chicago it has been quite snowy already so it does not feel like fall at all!

Thank you for reading, and don't forget to follow me on Twitter @MakeupMatters1

*All products in this post were purchased by me.  This is not a sponsored post. I do not get paid to write reviews or include any specific products in my posts.  All opinions are my own.